.png?width=300&height=77&name=black-logo%20(1).png)
You can now set up automated actions to be; created, assigned, and sent out to the desired parties as long as they have a Corfix account. This is great for many different use cases but 2 that stick out are: Corrective Actions and Preventative Actions.
If you are unfamiliar with the template builder it is suggested you start by view the videos through this link before proceeding further: Template Builder Tutorial Videos
As always, if you are looking to add new aspects to a Form that you are already using in the field. It is always best to copy the Template and edit/test within the copy until you are comfortable and understand the changes you want to make. Then take those edits to the Template that is currently Active and delete the copied template.
We have introduced a new component within the Template Builder. This new component is called "Tasks". This Tasks component is where you can now set up automated actions and tie them to the specific inputs on your template. For example, if a Forklift checklist fails, you can now set up a Task to be created automatically and auto assigned to the mechanic so they know work has been requested from them. We will go through this scenario below.
Another thing to keep in mind is that the Tasks component currently supports pulling data from the following:
- Checklist
-
Dropdown (Projects/Workers drop downs are not supported)
-
Radio
-
Select Boxes
Note: You will also want to make sure all of your questions you are going to ask on the form are set up before you proceed with the following steps.
The Tasks component is not supported when nested in a Table component.
Step 1: Go into one the template you want to set up automated actions for. The example below is going to be using a ladder inspection.
In the picture below you can see a bunch of Select Boxes are being used.

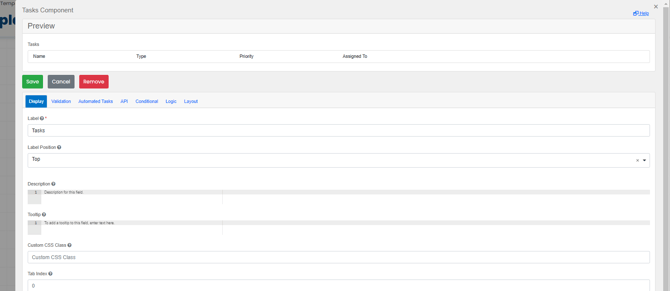
Step 2: Scroll to the bottom of your list of questions or survey and drag and drop the Tasks Component right underneath. The Tasks component settings will pop up.

If you have Data Grids or Edit Grids in your template you will need to make sure to add a Tasks component into each one. The Tasks component must be placed inside each Edit/Data grid.
Step 3: Select the Automated Tasks option.
Step 4: Here is where you can set up your automations.
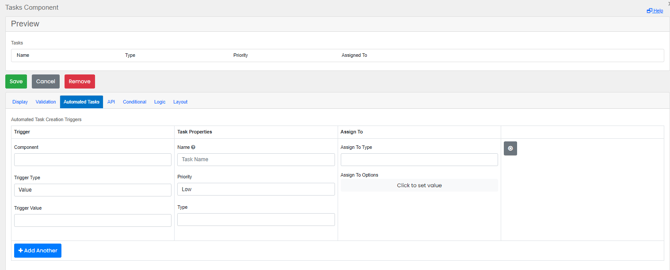
An automation is needed to be set up for each question.
Step 5: Fill out fields as needed;
Component: Choose the component you want to automate a Task for.
Trigger Type: What will be the trigger that sets the automated Task in motion: Flags or Value.
Trigger Value: Choose what answer/trigger will want to set up
Name: What do you want the name of the Task to be when it is created.
Priority: How severe is this Action.
Type: What Type of Action is this. You can customize what is in this list through the Task Types page.
Assign To Type: Choose who you want to assign the task to.
Below is an example of 2 Automated Tasks. Now when ever the Trigger Value is True in the Form as the workers fills it out, the Task will then be created and assigned.
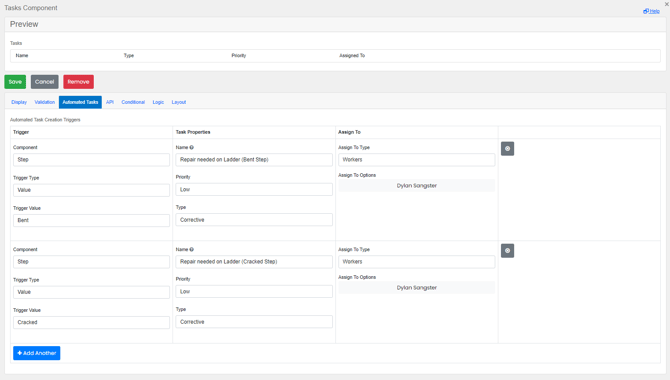
Step 6: Push Save when done and test out your Form before announcing it to the Workers! In the example above there is now an automated process for;
1. Every time a spreader arm is broken and recorded on this Form an automated task will be sent to Dylan.
2. Task will be created for Dylan and Dylan will be notified with the task (Repair needed on Ladder - Bent, for example) and will be able to review the form that was filled out for review and Dylan can then mark the Task as comlete when done.
Next Steps
Now that you have set up your automated task the next step is to learn how to manager it! How to manage Automated Tasks.