How do I integrate Corfix with Quickbooks Online (QBO)?
This article will show you how to integrate your Corfix account with your Quickbooks Online account.
If you are using Quickbooks Online(QBO) with Quickbooks Payroll, we will not be able to pull over Pay Rate Codes(Regular, Overtime and Doubletime) into the Pay Item Field within time activities in QBO. However, the integration can pull in all other fields. Manual input will be needed in QBO payroll to populate this field. Please ask your CSM for more info if you have questions.
If you are using just Quickbooks Online without Payroll, we will pull the Pay Rate Codes into the Class field in QBO. Make sure that both the Class options in QBO and the Pay Rate Codes in Corfix are exact matches (case and character).
Skip to steps on how to set up the integration
Field Mapping for both scenarios: (Corfix field : Quickbooks field).
Quickbooks Online with Payroll:
Project Name : Customer
Cost Code : Service Worked
Worker Name : Employee Name
Hours field gets pulled into the hours for the day
Below is a visual representation of what fields map to in QBO from Corfix.

Quickbooks Online without Payroll:
Project Name : Customer
Cost Code : Service Worked
Worker Name : Employee Name
Pay Rate Codes : Class
Hours field gets pulled into the hours for the day

Here is a helpful article on how to set up classes in your QBO environment.
Follow these steps to get started:
Step 1: Click on "My Account Details" from the left side menu

Step 2: Click on "Add" in the top right beside Integrations
If you do not see the Add button, please make sure to check your Permissions in your Role to ensure that the following Permissions are toggled on:
Contact your companies Corfix Admin to change the Permissions in your Role if you do not have access to edit Roles.
Step 3: Select the Quickbooks Online integration and then click "Connect"

After you click "Connect" the page will automatically bring you to your Quickbooks Online account and prompt you to log in.
Step 4: Log in to your Quickbooks online account

Step 6: Connect your company to your Corfix Account

Step 7: Manage your integration by mapping your Corfix information to your Quickbooks Online information. To do this click "Choose Action" beside your Quickbooks Online integration and click "Manage".

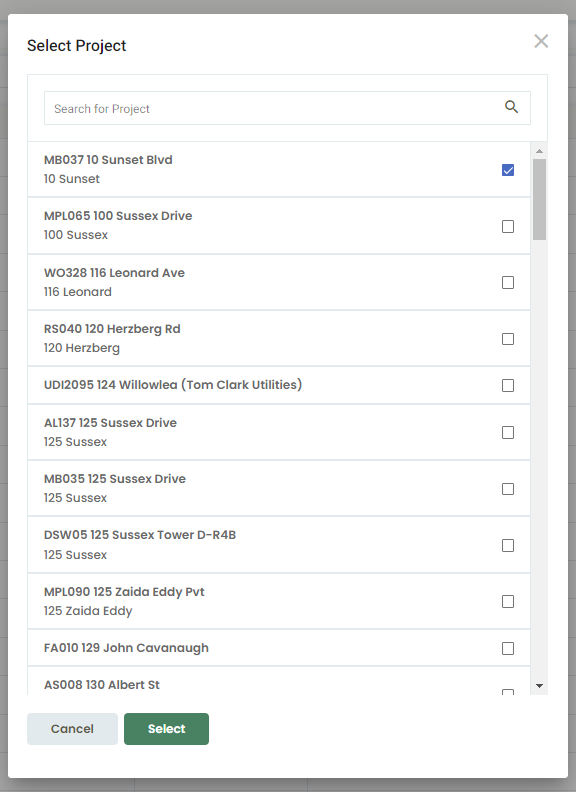
Step 8: Make sure that your Quickbooks Online names/projects/cost codes are mapped with your Corfix names/projects/cost codes. To map these items, click "Choose Actions" beside each item and then "Edit Mapping". You can also remove mapping by selecting "Remove Mapping".

A pop will appear so you can link the Corfix Worker/Project/Cost Code to the QBO equivalent, in this case it is Project.

You will know you have the Project/Worker/Cost Code linked after pushing save when it appears under the Corfix columns.

When you are ready to export your timekeeping information to Quickbooks Online follow the steps below.
Exporting for QBO
Follow these steps to export your Corfix timekeeping information to Quickbooks Online after you have mapped your workers/projects/cost codes:
Step 1: Click on "Timekeeping" from the left side menu and then click on "Export" in the top right

Step 2: Select your pay period or time range and then enter Quickbooks Online in "Export Type" and then click "Export Timecards"

How to View Weekly Timesheets in QuickBooks Online
-
Sign in to QuickBooks Online.
-
In the left navigation menu, click + New.
-
Under Employees, select Weekly Timesheet.
-
Choose the name of the employee you want to view.
-
Select the week you want to review using the calendar navigation.
-
You’ll see the grid view of hours worked per day, along with the customer/project and service item (if tracking billable time).
Tip: You can switch to Single Time Activity if you prefer to enter or view one day at a time.
Do You Need a Specific Subscription?
-
QuickBooks Online Essentials, Plus, and Advanced plans all include time tracking features like Weekly Timesheets.
-
QuickBooks Online Simple Start does not support timesheets.
How Weekly Timesheets Interact with QuickBooks Online
-
Payroll Integration
-
Hours entered in weekly timesheets flow directly into QuickBooks Online Payroll (if you’re subscribed).
-
This eliminates double entry—approved timesheets automatically calculate gross pay.
-
-
Billing & Job Costing
-
If time entries are marked as billable, they flow into invoices.
-
When linked to customers/projects, they contribute to job costing and profitability reporting.
-
-
Approvals & Workflow
-
Admins can review/edit timesheets before running payroll or creating invoices.
-
With QuickBooks Time integration, employees log their hours via mobile/web, and those sync back to QBO.
-
QuickBooks Online is a third-party platform that may update or change its software features and functionality at any time. As a result, certain workflows or integrations described in this knowledge base may no longer function as expected.
If you notice any discrepancies or encounter issues with the integration after a QuickBooks Online update, please notify our team immediately so we can review and address the matter.
.png?width=300&height=77&name=black-logo%20(1).png)