This article will summarize how to set up your Corfix account for the Quickbooks Desktop export.
To get started you will need to make sure that your Corfix account and Quickbooks account mirror each other to allow you to export smoothly. The overall goal is to make sure that your Corfix Projects, Workers, Cost Codes (if applicable), and Pay Rate Codes are set up just as they are in QuickBooks Desktop(QBD).
1. Projects (Timetracking Customer Identifier)
2. Workers
Setting up Projects
The Timetracking Customer Identifier should follow the naming convention Customer Name:Job Name. This should be the naming convention you have in QBD for your projects. You want to make sure to copy the exact name from QBD into the Timetracking Customer Identifier in Corfix.
Finding the Timetracking Customer Identifier
Projects>Select Project>Select the Pencil button in the top right>Timetracking Customer Identifier
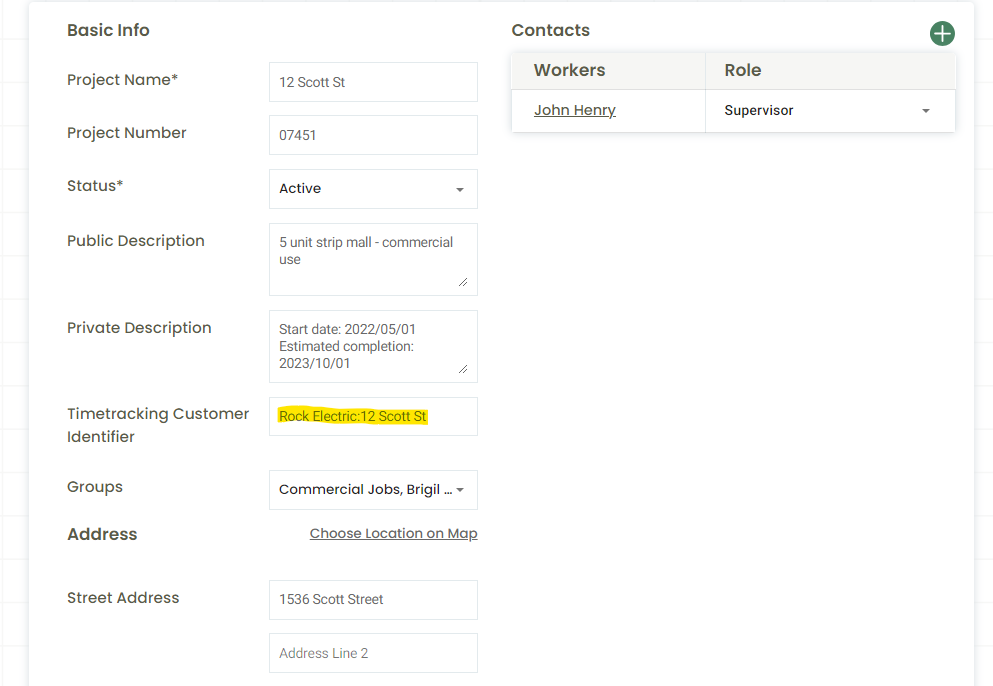
TIP: Any time you set up a new Project, it should be part of your process to populate the Timetracking Customer Identifier with the same Project name you have created in QBD.
Setting up Workers
To set up Workers, make sure that the employee's name in Corfix matches up with the employee's name in QBD. This will ensure a successful upload when the time comes.
If you have employees with 3 or more names in QBD, these employees will have to be manually imported.
Corfix exports in First Name, Last Name. In QBD there are preferences for Last Name, First Name or First Name, Last Name.
Ensure that your QBD is set up for First Name, Last Name to ensure a successful import. Here is a guide on how to do this within your QBD environment.
Payroll & Employees / Company Preferences tab: Display Employee List By
Setting up Cost Codes
Cost Codes in Corfix correspond to the Service Item in QBD. You want to make sure the Code - not the Description - in Corfix is the same as the Service Item Code in QBD. (See picture below)
To set up Cost Codes, you will need to make sure that the Service Items in QBD match up with the Cost Codes in Corfix. To find the Cost Codes in Corfix follow the path below:
Timekeeping>Settings>Manage Cost Codes
Once here you can add new Cost Codes or Manage Cost Codes using the Choose Actions button.

Amounts entered into a Fixed Cost Code will not export to QBD. Only the actual Code will be exported for both Fixed and Rate Cost Codes.
Setting up Pay Rates
Your Pay Rate Codes in Corfix tie to the Payroll Item in QBD. You want to make sure that your Pay Rate Code is an exact match to your QBD Payroll Item.
Almost there! You will need to make sure that the Payroll Items in QBD match up with the Pay Rate Codes in Corfix. To find the Pay Rate Codes in Corfix follow the path below:
Timekeeping>Settings>Manage Pay Rates
From here you can create new Pay Rates and edit existing Pay Rates through the Choose Actions button.
Select Edit with the Choose Action dropdown to edit the codes for each of your Pay Rates.
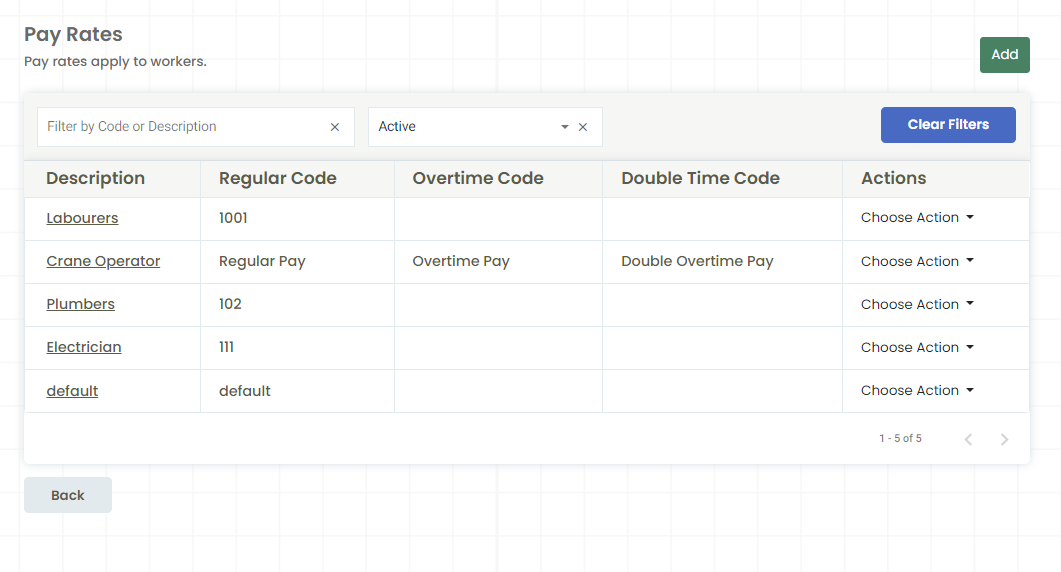
Ensure the following Codes match up with the Payroll Items in QBD:
- Regular Code (Regular working hours)
- Overtime Code (Overtime hours)
- Double Time Code (Double time hours)
Again, you want to make sure that the codes match up with the exact name you have in QBD for your Payroll Item.
🎉You have finished your QBD export set up in Corfix. Be mindful that you need to update both systems(QBD and Corfix) when new Projects, Workers, Cost Codes, or Pay Rates are implemented. If you have further questions please advise your CSM or reach out to Support.
Next step: How to export your hours from Corfix and import them in to QBD.