.png?width=300&height=77&name=black-logo%20(1).png)
A step-by-step guide for Corfix clients
This guide walks you through, step by step, how to move approved time from Corfix into Sage 50. It also shows you how to fix an import if something is off, and explains the questions we hear most often.
What you need before you start
- Your employees and projects should already be set up in Sage 50. During the import, Sage will try to match each worker and project to an existing record, and you can create new ones if needed.
- A few minutes. A single pay period for a crew imports in well under ten minutes once you have done it a couple of times.
The big picture
The whole process is two stages: get a clean file out of Corfix, then walk it through the import wizard in Sage 50. Here is the flow at a glance.
- Review and approve your timecards in Corfix.
- Export them as a Sage 50 CSV file.
- Open the Import Timesheets Wizard in Sage 50 and select that file.
- Confirm the data format, then map your columns and match your records.
- Finish, then pull the imported time onto paycheques.
Why approval matters
Corfix only exports approved timecards. Anything still sitting in Pending is left out of the file, so it never reaches Sage. Approving first saves you from a half-finished import.
Import each pay period only once
Right now, bringing the same time into Sage more than once will double the hours. Export and import each pay period a single time. If you need to correct something after importing, make the change directly in Sage rather than re-importing the period. See Fixing a mistake if you ever need to pull a bad import back out.
Step 1: Review and approve your timecards in Corfix
In Corfix, go to Timekeeping and open your timecards view. Use the filters at the top (Worker, State, Cost Code, Group, and the date range) to narrow down to the pay period you are working on, then click Search.
Check the hours in the Reg, Over, Double, and Lunch columns. When everything looks right, tick the timecards you want and click Approve. Approved cards change state from Pending to Approved.
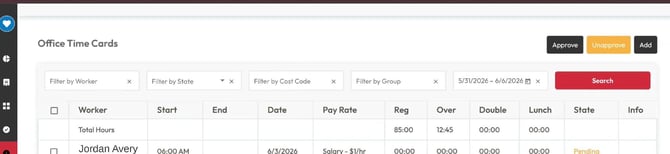
The Office Time Cards view in Corfix. Approve cards before exporting; the Total Hours row shows the regular and overtime totals for the period.
Step 2: Export your timecards from Corfix
Click Export to open the Export Timecards window, then fill it in:
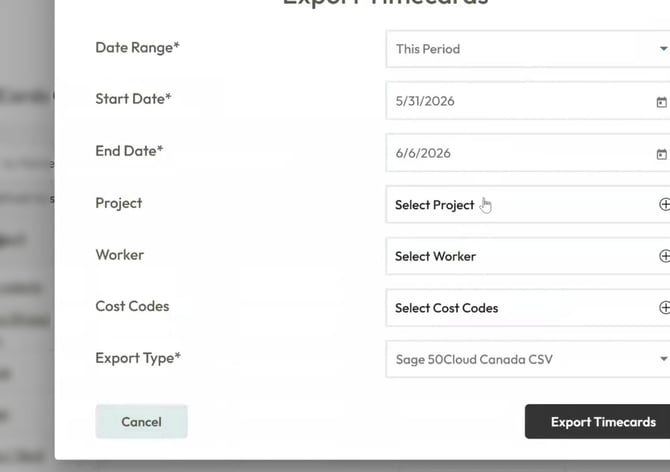
The Export Timecards window in Corfix.
|
Field |
What to do |
|---|---|
|
Date Range |
Pick a preset like This Period, or choose your own range. |
|
Start Date / End Date |
Required. These set the window of time the file will cover. |
|
Project |
Optional. Leave blank for everything, or pick one project (for example, Office) to export just that. |
|
Worker |
Optional. Leave blank for the whole crew, or pick one worker. |
|
Cost Codes |
Optional. Filter to specific cost codes if you need to. |
|
Export Type |
Required. Choose Sage 50Cloud Canada CSV. This is the format Sage 50 expects. |
When you are ready, click Export Timecards. The file downloads to your computer, usually into your Downloads folder. You will need that file in a moment.
|
Heads up: unapproved timecards If any cards in your date range are still unapproved, Corfix shows: “There are unapproved timecards in this time range. They will be omitted from the export. Please approve them before exporting.”
If you see this and you expected those hours, go back, approve them, and export again. |
Step 3: Open the Import Timesheets Wizard in Sage 50
Switch to Sage 50 and go to Employees & Payroll. Open the Import Timesheets Wizard. It runs in five steps: Introduction, Select File, Data Format, Import, and Finish.
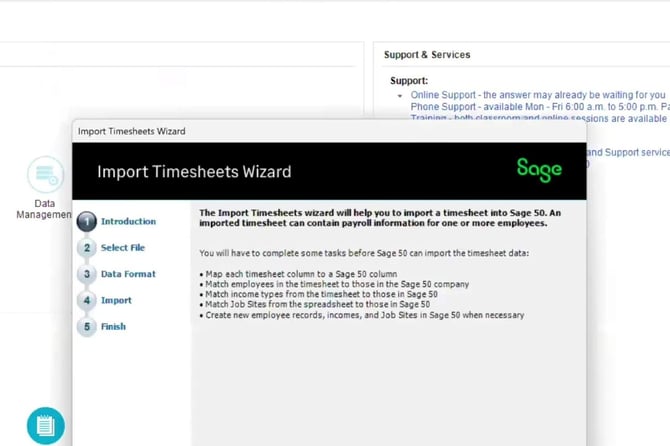
The wizard opens on the Introduction screen and lists the five steps down the left side.
The Introduction screen explains what the wizard does. During the import you will map each timesheet column to a Sage 50 column, match your employees, match income types, and match job sites. The wizard can create new employees, incomes, and job sites in Sage 50 if it needs to. Read it, then click Next.
Step 4: Select your file
On the Select File step, click Browse and find the CSV you just exported from Corfix (check your Downloads folder). You can also add a Reference label here to help you recognize this import later.
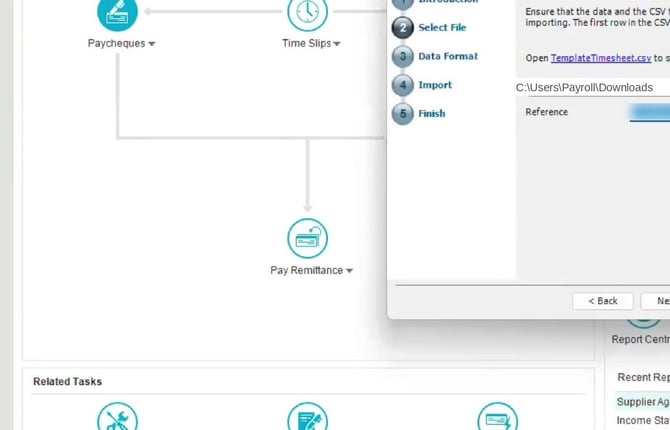
Browse to your exported Corfix CSV. The wizard links to a TemplateTimesheet.csv if you ever want to see the expected layout.
There is a link to a TemplateTimesheet.csv on this screen if you ever want to compare the layout. Because you exported in the Sage 50 format from Corfix, the file already lines up, so you normally will not need it. Click Next.
Step 5: Confirm the data format
The Data Format step tells Sage how the file is laid out. For a Corfix Sage 50 export, the defaults are correct, so in most cases you simply confirm them and move on:
- Separator: Comma separates each field.
- Date format: yyyy-MM-dd
- Time format: hhhh:mm
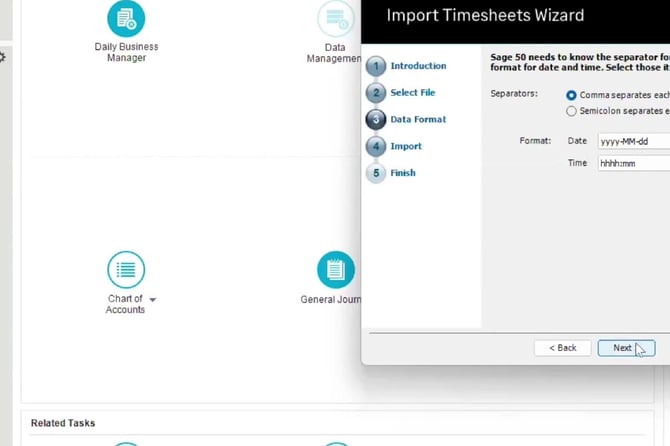
The Data Format step. Leave the defaults unless you have a reason to change them, then click Next.
Step 6: Map your columns and match your records
On the Import step, click the Map Columns button. This is where you line up each column in your file with the matching field in Sage 50, and where Sage checks that it can match your workers, income types, and job sites.

The Import step shows a running summary of what has been matched and what still needs attention.
As you work through it, Sage shows a Summary with green checks for things that matched cleanly and amber warnings for things that need a look. The three to watch are:
- Employees: each worker in the file is matched to a Sage 50 employee.
- Income types: each income from the file is matched to a Sage 50 income. The income comes from the pay rate a worker picks when they clock in. Map Regular to your regular income, and if the file includes overtime, map Overtime to your overtime income too, then click Save. If an income is left unmapped, Sage prompts you to map it before it will import those hours.
- Job sites: each Project is matched to a Sage 50 job site.
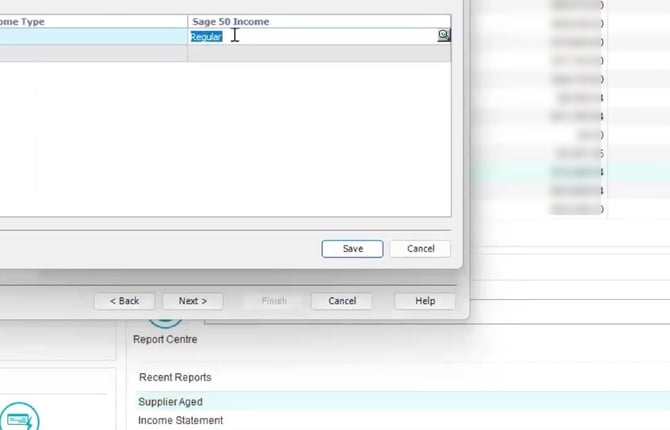
Matching an imported income type to its Sage 50 equivalent (here, Regular).
If a Project is not matched
Sage warns: “Unmapped job sites will not be saved with the timesheet line.”
The hours still import, but they will not be tagged to that job site. If you track costs by job site, use Fix Mapping to match it before you finish.
Step 7: Finish, then add the time to pay
Once your matching is done, click through to the Finish step. Sage confirms the import was successful.
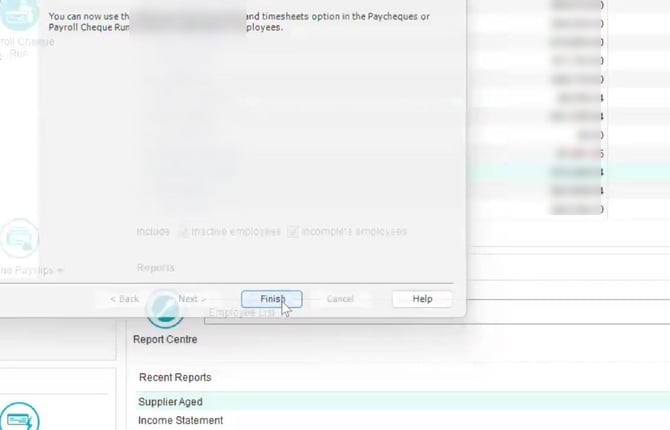
The Finish screen confirms the timesheet imported.
The imported time now lives as time slips in Sage 50. To pay it out, go to Payroll → Time Slips → Pay employee from timesheets, and select the employee. You can also use the Add time from time slips and timesheets option inside a paycheque or Payroll Cheque Run. Either way, Sage pulls the imported hours straight onto the cheque, so you are not retyping anything.
Fixing a mistake: deleting an imported time slip
If you import the wrong file, you can remove the imported time slips and bring in a corrected one.
Read this before you re-import
Importing a pay period that is already in Sage will add the hours on top of what is already there, so the totals double. For a small fix, the safest move is to edit the time directly in Sage and skip re-importing. Only re-import after you have first removed all of that period’s imported slips using the steps below.
Back up first
Before deleting anything, make a backup of your Sage 50 data. That way you can always roll back if you remove the wrong thing.
- Go to Employees & Payroll, then open Time Slips.
- Click Lookup Time Slip (Find Time Slip), search for the slip you want to remove, and click OK to open it.
- Click Remove Time Slip to delete it.
- Repeat for any other slips you need to remove.
Once all of that period’s slips are gone, go back to Corfix, make sure the timecards are correct and approved, export a fresh Sage 50 CSV, and run the Import Timesheets Wizard again from Step 3. Sage will not accept the exact same file twice, so give it a new Reference when prompted.
One more thing
If you are trying to remove an employee, Sage will not let you until all of that employee’s time slips have been cleared first.
Good to know (and the question we hear most)
Why do my hours look different in Sage than in Corfix?
This is the big one, and it is not an error. The two systems display time differently.
- Corfix uses a standard 60-minute clock, so you see hours and minutes, like 8:34.
- Sage 50 displays time in decimals, as a percentage of an hour. This is the normal way payroll systems show time so the math is clean.
To convert, you divide the minutes by 60. The total time paid is exactly the same; only the way it is written changes. For example:
|
In Corfix (h:mm) |
The math |
In Sage (decimal) |
|---|---|---|
|
8:34 |
34 ÷ 60 = 0.57 |
8.57 |
|
11:14 |
14 ÷ 60 = 0.23 |
11.23 |
So 8 hours and 34 minutes in Corfix shows as 8.57 in Sage. It is the same amount of time, and Sage pays the correct amount for it.
How overtime works
Corfix moves hours into overtime once a worker passes the overtime threshold set for your company. Hours up to the threshold sit in the Reg (regular) bucket; hours past it move into the Over (overtime) bucket automatically.
Moving overtime to regular
If Corfix puts hours into overtime but you need them paid as regular for a particular card, you can move them into the regular bucket manually in Corfix before you export.
Overtime carries its own income type, so it imports into your Sage overtime income, kept separate from regular. Like all time, it converts to decimal on the way in.
Time clocked in the middle of a shift is not rounded to match your Corfix settings, so an overtime figure can show with odd-looking minutes. If an overtime total ever looks off between the two systems, the decimal conversion is almost always the reason rather than a miscalculation. Run the minutes-divided-by-60 check and the numbers should line up.
Holiday pay
Corfix does not have a separate holiday bucket yet, so holiday hours do not split out from regular the way overtime does. For now, enter holiday pay directly in Sage.
Quick answers
- Import each pay period once. Re-importing the same period doubles the hours, so fix small errors in Sage instead.
- Overtime follows your company’s rules and imports into your Sage overtime income. Map the Overtime income during import, or Sage will prompt you.
- Only approved timecards export. Pending cards are skipped, so approve before you export.
- Export Type must be Sage 50Cloud Canada CSV. That is the format the wizard reads.
- Unmatched job sites still import the hours but do not tag them to the job site. Match them if you cost by job site.
- Imported time becomes time slips, which you then add to a paycheque or Payroll Cheque Run.
Quick checklist
- Approve the timecards in Corfix for your pay period.
- Export as Sage 50Cloud Canada CSV (note where it downloads).
- In Sage 50, open the Import Timesheets Wizard under Employees & Payroll.
- Select the CSV; confirm the data format defaults.
- Map columns and match employees, income types, and job sites.
- Finish, then add the time to a paycheque or Payroll Cheque Run.
- Import each pay period only once (re-importing doubles the hours).
- Remember: decimal hours in Sage are the same time as h:mm in Corfix.
Still stuck? Reach out to your Corfix contact and we will walk through it with you.